I really hate to do this…

Standard

Well, folks, I’ve considered it a lot lately, and I think I’ve decided to export Creative Chronicle over to Blogger for a bit. I’m just starting to feel really limited with what I can do with the blog and what I can/can’t have with WordPress.

I’m still in the process of re-working the design, but I do hope you will visit me at the new site while I decide to try it out. If all else fails, I will return to old faithful here, but I’m going to throw caution to the wind and give blogger a shot.

NEW LINK:

http://mycreativechronicle.blogspot.com/

UPDATE:

Scratch that! I’ve decided to go ahead and take it a step further – I’ve got my own domain now…You’ll find the blog you love here now:

http://www.mycreativechronicle.com/ 

Mustache Espresso Mugs for the Bride & Groom

Standard


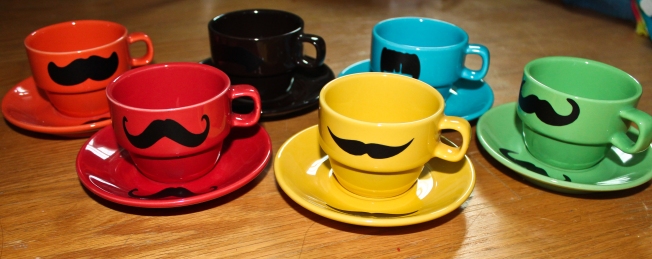
Have you seen the adorable mustache mugs that seem to be floating everywhere around the internet? Well, my bff Sarah was having her wedding shower, and I was running out of ideas for gifts that could be made within a short time frame. I turned to her etsy wishlist, figuring that if I couldn’t make what I wanted to in time, I could at least purchase her some of the things she’d wanted. That would be where mustache espresso mugs popped up. There were a few people selling identical sets, but once I combined the cost and the shipping, the pricetag was looking pretty hefty. So I started seeking alternatives… It would stand to reason that if multiple people were selling identical colored espresso mug sets with the same plates, the same mugs, and the same stand, that the set must exist somewhere out there on the wide open interweb for people to purchase minus the cool looking staches.

Guess what? I was right. World Market sells this fantastic set online for a fraction of the price you’d pay for ones with added staches.  My thought – BOOYAH! I got this. I’ll just make my own….. and that I did.

A quick trip to A. C. Moore, and I had a small sheet of black vinyl in hand. From there, I handed it over to my sister and her husband, who own the most miraculous machine I’ve ever seen (and am also very jealous of) – The Silhouette. If you haven’t seen this thing, you need to. Immediately.  Think of the Cricut but without all of those cartridges you constantly have to purchase. The Silhouette works through your computer and cuts just about anything from paper to vinyl. You can use their software which includes several free images for your use, purchase others that they have (most of which are $0.99), or if you’re familiar with creating your own vector art – you can plug in your own images! HOW FLIPPIN’ COOL!!! So there you go, that’s how I got a sheet of these serious staches. Of course, we had to do mustaches in several sizes since I was running low on time and didn’t know the exact size I would need by the time the mugs would arrive.

Now, most sets you see only put the vinyl mustaches on the cups. I, however, decided to make the set even more stache-tastic, and included a matching mustache on the plates.


How awesome are those? These are definitely a gift that I’d want to keep for myself, but they are so simple I could definitely make them again for myself (and most likely will).  As for how they hold up, I gave them all a good rub down to see how well they would stand up against regular use. The vinyl stayed put, and as long as these dishes are hand washed, they should last for quite awhile. If you make these for someone you know, just be sure to remind them to hand wash only!


Just FYI – As you can see, the package says “red, orange, yellow, green, aqua, and BROWN”. This, my loves, is a LIE. The last mug is most certainly BLACK. So black, in fact, that it would be great if you had a different color vinyl to make the mustache stand out on that one. I did not, but hey, it’s the thought that counts. The bride loved them (and the other handmade gift – which I’ll be posting asap), so that’s what matters!

SIDE NOTE:

It’s been a crazy couple of days. The day before last, I started working on this blog post, and I had the majority of it finished other than adding links and such. I had planned on finishing and posting it yesterday after returning from my coworker’s birthday celebration that we were having on my boss’s boat in the middle of a beautiful lake. Well, you may or may not have heard the news, but the East Coast got hit with a pretty nasty storm. So nasty infact, that it pretty much felt like going through a tornado WHILE ON A LAKE. I’d like to say that I kept my cool under pressure, but I’d be wrong, and I hate to be wrong. It was in fact ridiculously scary. Not only that, but once we finally made it out of that hellish situation, I returned home to be without power for over 24 hours. So, here I am, finally getting to share this post with you…and also an adorable picture of Otis helping us to remove all the debris from the fallen tree limbs in the yard.

For those (many) of you still without power, my thoughts are with you. Keep cool, and do what I did today, get crafty! It doesn’t require electricity, and at least you feel like you did something other than spend the day counting how many minutes you’ve gone without air conditioning. I lost count. Pioneer woman, I am not.

My First Etsy Shop! Woohoo!

Standard

Well, everyone, I FINALLY did it. I created my own etsy shop. It’s something I’ve been wanting to do for awhile, but I tend to want to hoard whatever I have and not part with anything. No more, I say! I’m going to let go, whether it’s something I’ve made or supplies I purchased and never used, it’s time to set them free and let someone else use them! Right now I’m selling a few supplies that I’ve picked up at estate sales and such, but I’m hoping that maybe soon I’ll move on to selling my own crafty goodies. Please check me out, there may be something you are interested in:

http://www.etsy.com/shop/CreativeChronicle


Here’s a preview of what’s there now:


IMG 4538 3

Vintage Porcelain Bisque Baby Doll Head & Hands Set (Numbered)

IMG 4529 1


Pick of 5 Leather Shapes (Oval/Butterfly) for Keychain Making plus 5 Keychains

Thanks, everyone! Here’s hoping I actually sell something! Wish me luck!

Sheep Baby Bib Pattern

Standard

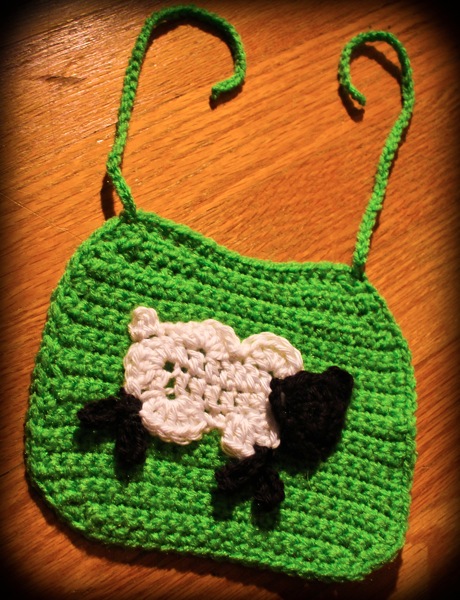
Sheepbib

Well, with one Sarah’s baby shower gifts finished and all posted and another Sarah’s wedding shower gifts finished and in the progress of being posted, I thought I might have a chance to take a break, rest my hands, read a book…you know…relax for a few before moving on to the next project. Nope! Monday morning I got some very exciting news from one of my friends (wouldn’t you guess it…another Sara…this time without the “h”). She’s having a baby! This is all so exciting for me. So many life changing events happening for so many friends, and I’m lucky enough to get to share in all of them. Sara said she’d just completed her first trimester and was ready to tell everyone the good news. She’s due December 22nd, and is supposed to find out whether it’s a boy or girl during the weekend in July Mister and I will be visiting with her and Justin. We’ll get to celebrate with them (and I’ll also know whether to start incorporating pink or blue into my projects)!

Well, I was so excited by the news, I decided to go ahead and start the first little gift, this baby bib. It’s really fairly simple, so I’ll share with you how it’s done.

For the bib base you need:
G (4.25mm) hook
4 ply worsted-weight yarn – color of your choice, I just happened to like the lime with this one. I picked Red Heart brand yarn, since it’s what I had on hand.

The pattern I used for the base comes from the Lion Brand free patterns for a frog bib, but it works just the same here, you’re just only making the bib – not the frog face.


BIB:

Chain 17

Row 1: 2 sc in 2nd ch from hook, sc in each ch across to last ch, 2 sc in last ch – 18 sts.

Row 2: Ch 1, turn, 2 sc in 2nd ch from hook (increase made), sc in each sc across to last sc, 2 sc in last sc – 20 sts at end of row.

Rows 3 and 4: Rep Row 2 – 24 sts at end of Row 4.

Row 5: Ch 1, turn, sc in each st across.

Rows 6-20: Rep Row 5.

Row 21: Ch 2, turn, hdc2tog, hdc in each of next 6 sts, sc in each of next 8 sts, hdc in each of next 6 sts, hdc2tog – 22 sts remaining at end of row.

Row 22: Ch 2, turn, hdc2tog, hdc in each of next 5 sts, sc in each of next 8 sts, hdc in each of next 5 sts, hdc2tog – 20 sts.

Row 23: Ch 2, turn, hdc2tog, hdc in each of next 4 sts, sc in each of next 8 sts, hdc in each of next 4 sts, hdc2tog – 18 sts.

Row 24: Ch 2, turn, hdc2tog, hdc in each of next 3 sts, sc in each of next 8 sts, hdc in each of next 3 sts, hdc2tog – 16 sts.

Work 1 rnd sc evenly spaced around entire outside edge of Bib. Fasten off.

TIES (make 2) From right side, join A with slip st at one upper corner of Bib. Ch 40. Fasten off. Rep on opposite corner.

From here, the options are limitless! Sure, you can do the sheep like mine, or the frog face like the Lion Brand pattern suggests, or even any other design you come up with or find online. These bibs are so quick and simple to make, you can crochet a wide variety of fun colors and designs.

If you like the sheep I used though, then follow this link to the pattern I found to use. Personally, I found it a little unclear and confusing (I’ve never heard a magic circle referred to as a “wa”!), and I really just ended up winging it to come up with a similar shape to what I wanted. I even added the little poofy tail. It may not be perfect, but I can justify it in my head as it will probably one day have spit up on it from a beautiful baby boy or girl.

— My vote is that she’s having a boy 😉 We shall see!
Baby Lena’s Blanket, Booties, and Shower Time! :)

Standard

Original 3 2

In my previous post, you got to see the majority of the gifts I had completed for my friend Sarah’s baby shower to help welcome her little girl into the world. There was so much more I had wanted to do, but sadly, I did not get to do everything on my list. On the bright side, I’m pretty sure baby Lena isn’t going anywhere for awhile, so I’ll still be able to crochet her a bunch more goodies as time allows. I was able to finally finish the summer weight blanket that I showed you at the end of Progress on Crochet Gifts for Baby Lena. Here it is!:


Crochet8

I’m still a really big fan of the bright colors over traditional pastels, and the weight of this yarn was so easy to work with. I added a few more rounds since the previous picture and then finished the edging with a shell stitch.

If you read the last post then you’ll also know that I was having the world’s worst luck finding a pattern that worked for some booties. I had the pink rose headband made, and nothing to go with it. Well, I have to say it Mikeyssmail from The Crochet Crowd has saved my butt once again. It was the day of the shower (less than six hours before, actually), when I stumbled across his youtube tutorial for an easy pair of booties that were said to take only twenty minutes. I’m really not sure why I didn’t think of Mikey before, because I’ve used his videos countless times on several different projects. It was also fantastic that he included the written pattern (HERE), even though I prefer to watch and crochet along with the video.

Crochet2

Once the base of the booties was finished, I added flowers made simply like this:
Create your magic circle using four chain stitches and then slip stitching to the beginning.
Chain 3. Slip stitch inside of the magic circle.
Repeat x4 so that you have 5 petals.
Slip stitch to tie off, and leave a tail long enough that you can weave it into the booties to tie them on.

Original 7

This happens to be my other BFF Sarah, who had her wedding shower last week (You’ll get more on that later, as I have a couple of posts to catch up on that include my gifts for her). This game was to blow up a balloon, put it under your shirt, and see who could get closest to the Mommy-to-be’s baby bump size. I was really close, I swear!


Original 25

On top of the crochet gifts, I had to get little Miss Lena her first books as well (because what kind of English major would I be if my gifts didn’t include at least one book?) . These were just too cute to pass up. There’s a version of Dr. Seuss’s Oh, the Places You’ll Go that’s meant to be read in utero and was adapted by Tish Rabe. It’s positively adorable and includes so many of the classic Seuss characters. You can check out all the details for the book here.
I also found these fantastic Baby Lit board books by Jennifer Adams and Alison Oliver. They are positively adorable adaptations of classic works for small learners. I picked out the Alice in Wonderland that teaches colors and the Pride and Prejudice that teaches numbers. I’ll definitely be purchasing these for my own kids whenever I decide to have them, and I really hope baby Lena enjoys them once she’s old enough to start reading (which, knowing her mommy, I’m sure will be early on!).


Original 32

Sarah is due to have her baby August 30. We can all barely wait for Lena’s arrival, and I’m certain I’ll have a few more gifts up my sleeve as she starts her young life. 🙂